Setting up MIDI controllers in Ableton Live
Evolution U-Control UC-16
It’s not always easy setting up MIDI controllers in Ableton Live.
The good news is that it’s usually possible to get most MIDI controllers to work eventually, following some logical steps. I managed to get an old Evolution U-Control UC-16 MIDI controller that I found in a draw working. It hadn’t been powered up for at least 5 years!
This article explains setting up MIDI controllers in Ableton Live. Specifically the Evolution U-Control UC-16.
Setting up MIDI controllers in Ableton Live: Step-by-step guide
Step 1
Load up Ableton Live. In this example, I’m using Ableton 11 but the process should be similar if you are using a different version.
You don’t need to install any drivers for the UC-16 despite what the instructions tell you.
Step 2
Click on the “Options” tab along the top and in the menu that opens, click on “Preferences…” at the bottom.

Step 3
In the preferences box that opens up, select the “Link/Tempo/MIDI” tab. Under the MIDI section, there are three columns.
These are “Control Surface, Input and Output”. Assuming you haven’t set anything up here before these will all be blank, however, in my example, I’ve previously set up the “M-Audio Oxygen 8 v2 MIDI controller keyboard”. This is configured on line 1 so I’m going to use line 2, but if you’ve nothing previously set up, you can use line 1.
All three boxes on line 2 are preselected with “None”. Click on the down arrow in the “Control Surface” box and a list of devices opens up. Select the device you want. Here I’m looking for the UC-16 however it doesn’t appear on the list so I’ve selected UC33e, as that’s the nearest device.
On the next box along which is “Input” click on the down arrow and a smaller list of devices opens up. In my example, I’ve got “UMC204HD 192K MIDI IN” which is my sound interface. “USB Oxygen 8 v2” which is my MIDI controller keyboard and “UC-16 USB MIDI Controller” which is the device we’ve just plugged in Interestingly it detected the exact device.
If you haven’t installed anything yet, you will just have the one choice. So just select “UC-16 USB MIDI Controller.” Do the same on the next box along which is “Output”.

Step 4
Under this section, there will now be a list of “MIDI Ports”, with inputs and outputs.
You are looking for “In: UC33e Input (UC-16 USB MIDI Controller)”.
There are four boxes after this. These are “Track” “Sync” “Remote” and “MPE”. I won’t go into the details of these here, but you have to click on the “Remote” box. This will then change to orange and have a “tick” in it.
You can then close up the “Preferences” box by clicking on the red “cross” in the top right-hand corner.
Step 5
You now have to set up the UC-16 to operate a device. In this example, I’m using one of my favourite synthesisers.
This is the Native Instruments Massive X. The setup is pretty similar for other things though. Select Massive X on a MIDI track and the front panel will open up.
To make it easier to see what you are doing you can click on the red “cross” in the top right-hand corner to close the panel up.

Step 6
In the “Device Title Bar” of the Massive X, click on the down arrow, just to the right of the orange circle.

This opens up the 16 macros that we are going to configure for the 16 controllers on the UC-16 as none of them will do anything until they are set up. Click on the “MIDI” button on Ableton. It’s in the top right corner. Just left of the percentage CPU indicator.
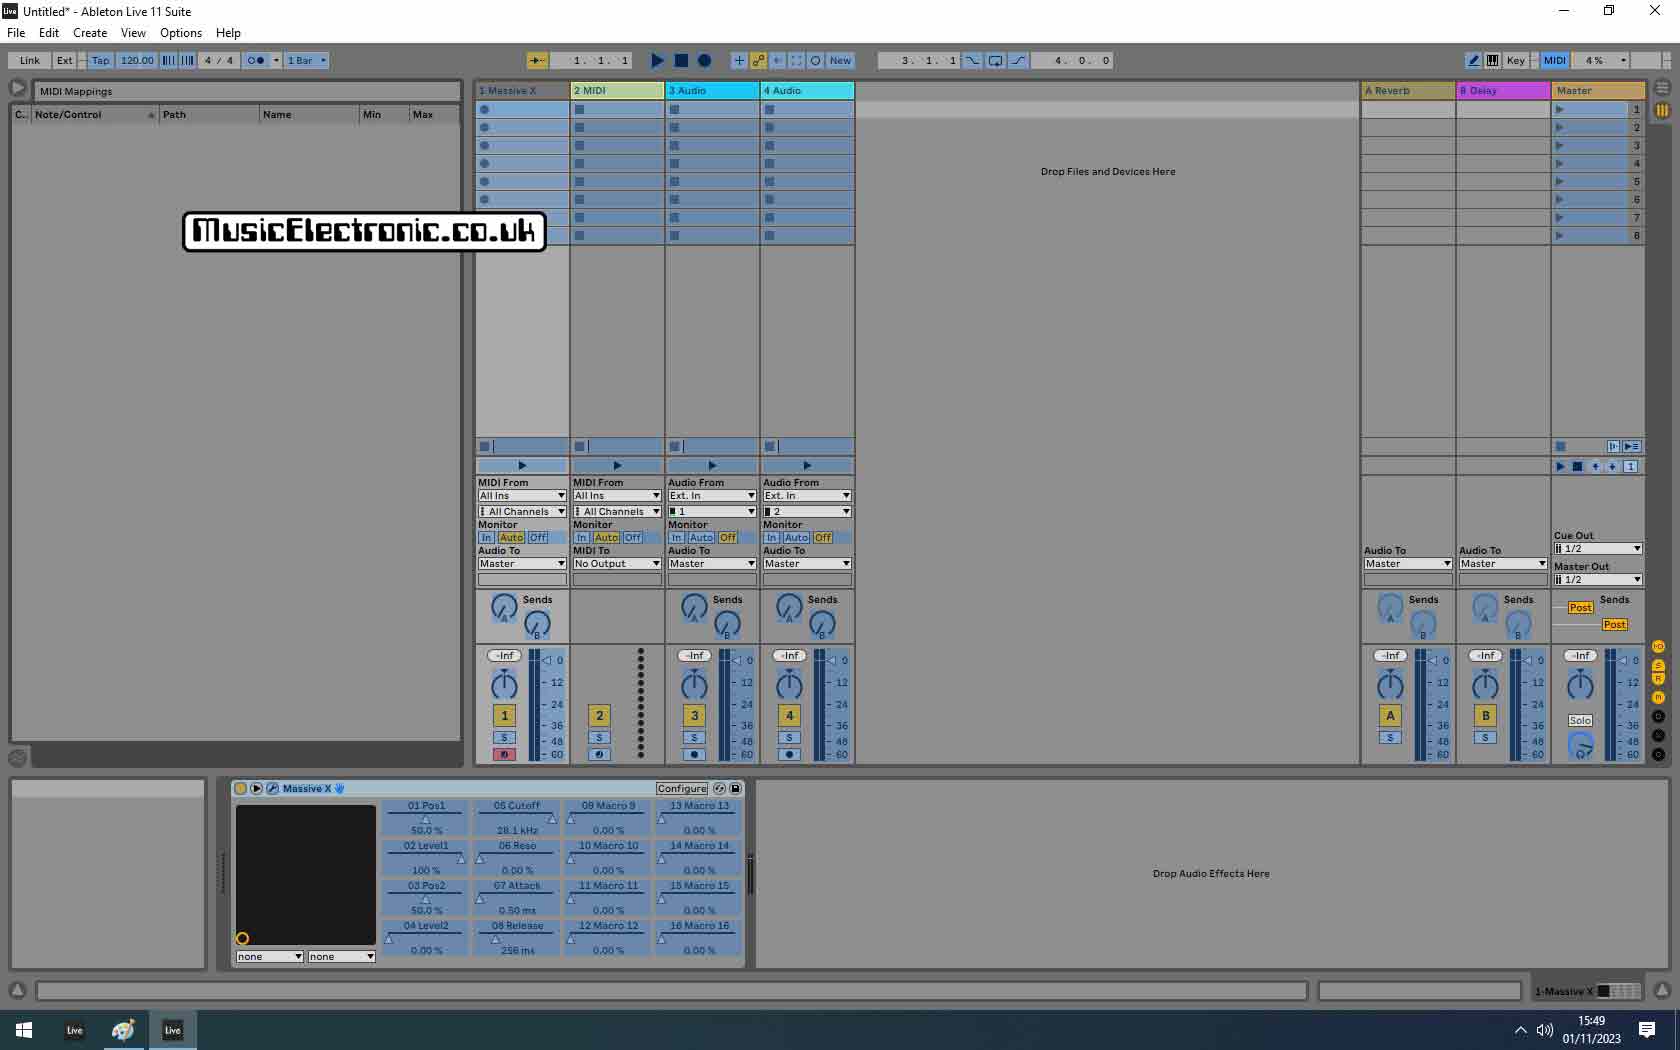
This will then turn blue along with other parameters that can be set up for the Evolution UC-16 to operate. In the Massive X box, you’ll see the 16 macro controls all blue. Click on the “01” box and an arrow will appear in the middle of it. Now turn the “Assignable Controller 1” on the UC16 and you’ll see the box “corners” appear along with “1/116”.

This is the number of the MIDI controller. It may well be something different from yours but don’t worry. It all depends on how the UC-16 was last configured. The main thing is that a number appears! Next, click on the “02” box and turn the “Assignable Controller 2” on the UC16 and the same thing will happen.
You should click on all 16 of the macros and set up all 16 “Assignable Controllers”. You’ll see a list of “MIDI mappings” being compiled in a list on the top left of the screen. Click on the Blue “MIDI” box now all the programming has been done.

Step 7
Now the exciting bit! If you turn any of the “Assignable Controllers” on the UC-16, you’ll see the arrow going left or right as you turn the corresponding knob.
Click on the “Spanner” icon to open the Massive X control panel up and you’ll see the macro controls in a line along the top. These will now visually alter as you move the UC-16 knobs.
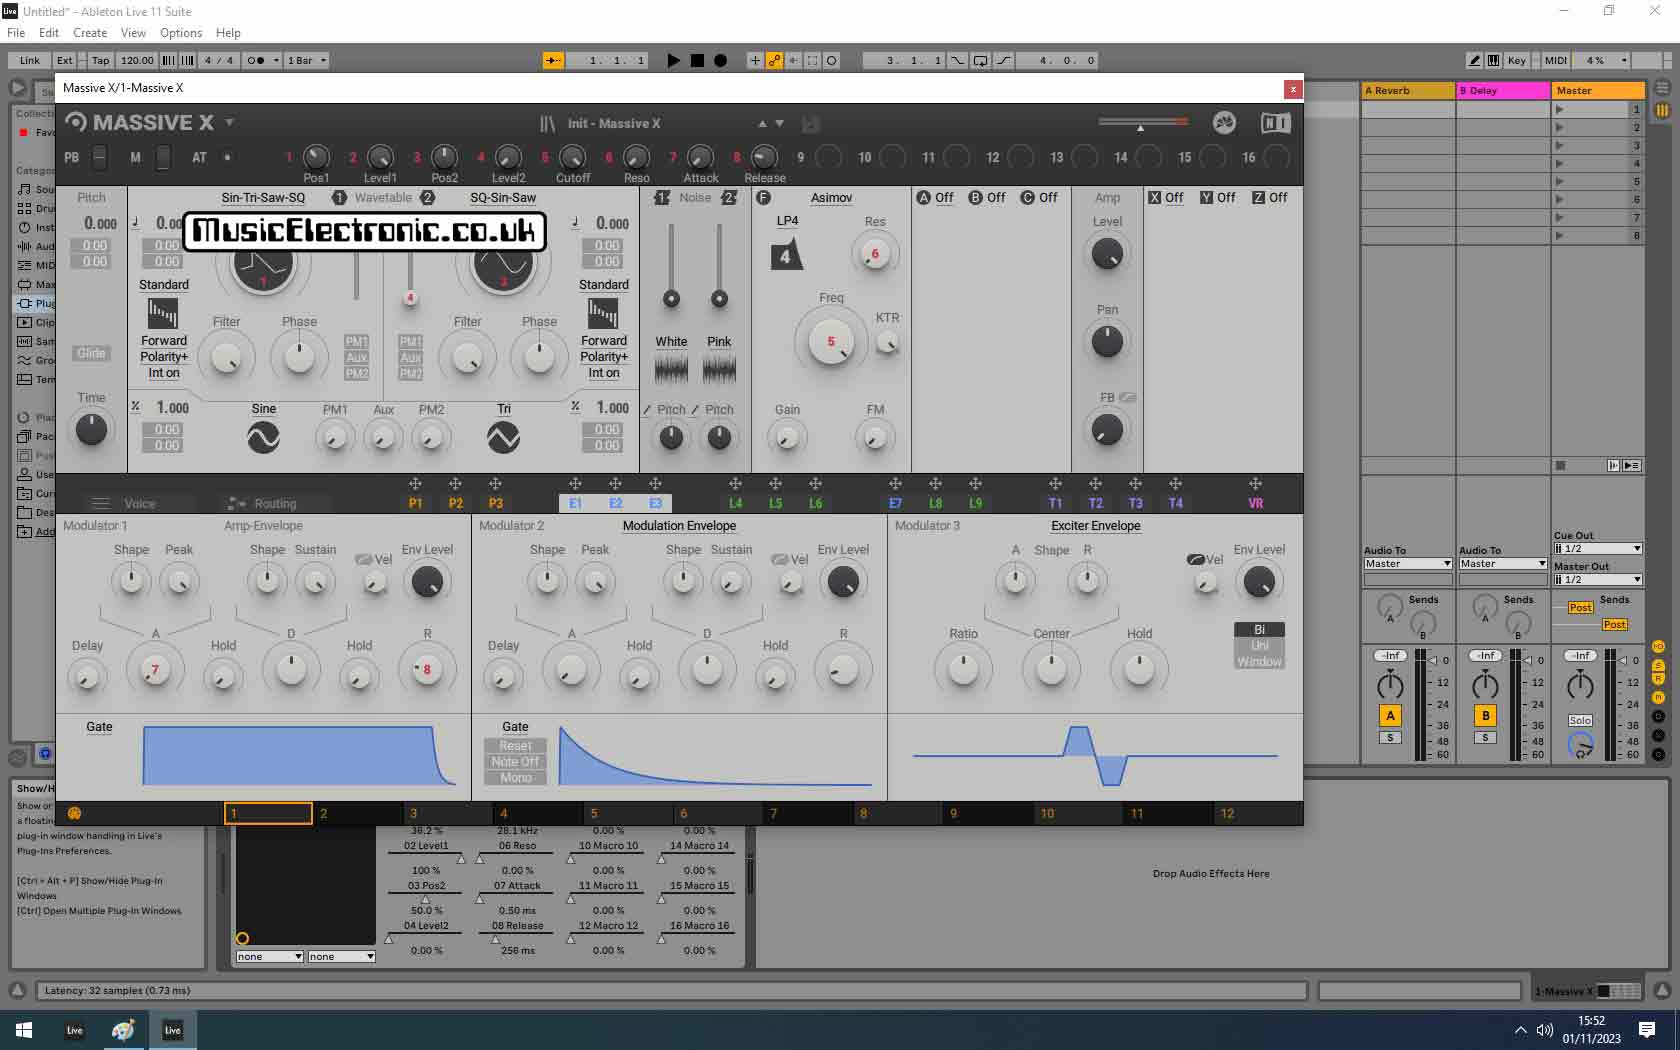
By default, Massive X only has the first 8 set up but as we’ve already set the full 16 up, all you have to do is click on the “9”. You’ll then see in red, the Massive X controls that are already assigned to macros. Click on one that’s not assigned. Here I’m clicking on “Pulse Modulation 1”. You’ll see the number “9” move with the mouse till you click on the control.
The PM1” button now has a red “9” on it and the ninth control has now turned from greyed out to red with “PM” under the control. Turning the UC-16 knob 9 will now control the previously unused ninth macro. You can just as easily set up the others so you’ve got the full 16 all assigned.
Tip
The method I’ve described here is the easy way.
There are others but that means you will have to program the MIDI controller. That’s if it’s even possible. I prefer to use a MIDI controller that’s got its default settings and let Ableton do the difficult stuff.
The problem with this method is that if you open up the device again you’ll have to reprogram it! To avoid having to do this all the time I’ve set up all my popular synthesisers and then saved this as a project.
If you start with this project and rename it when you start a new song or session you’ll have all the set-up done for you every time.
Setting up MIDI controllers in Ableton Live: How to get other devices set up
The process can vary slightly depending on the device.
Using one of the excellent Arturia collections, I’ve opened up the “Arturia CZ V”. If you click on the down-pointing arrow in the “Device Title Bar”, there are no plug-in parameters as there were with the Native Instruments Massive X.

In this case, you click on the “Configure” button which turns green.
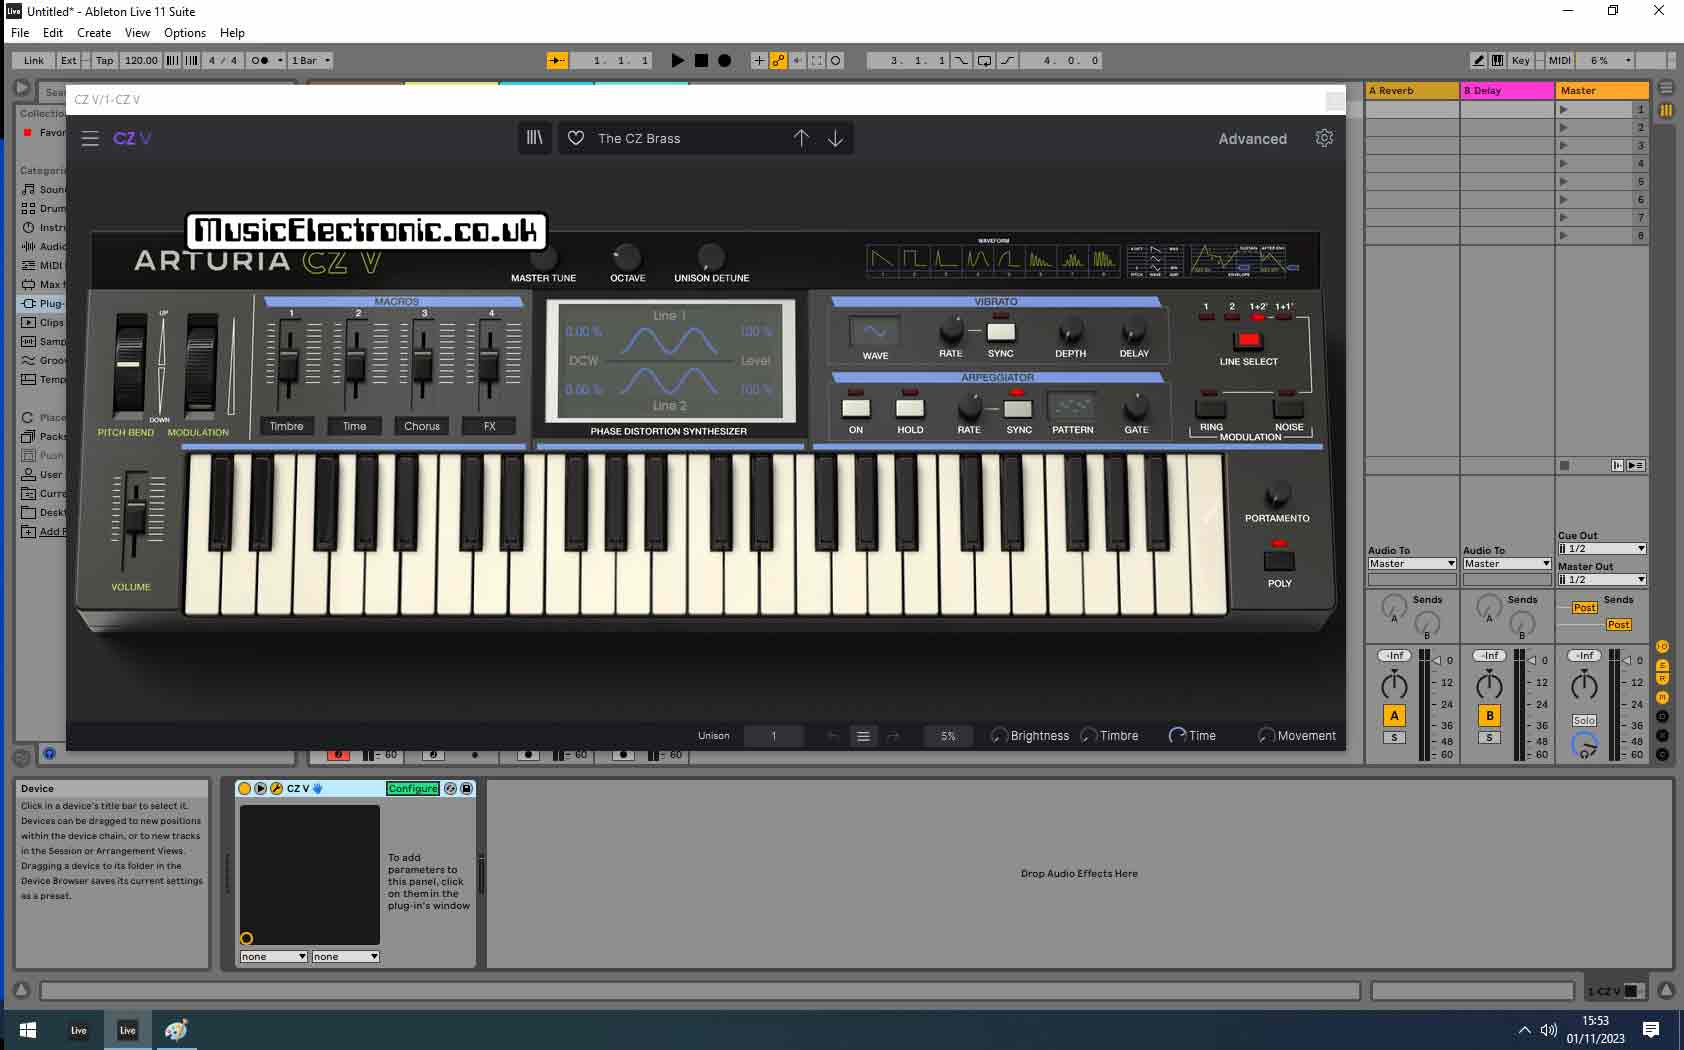
Then click on the control you want the MIDI controller to alter. In this case, I’m clicking on the “Timbre” slider. This then shows up as “Macro 1”. Click on any of the other controls you want, and these get populated in the configure box. They also get labelled, so for instance, “Arp Gate Length” appears.
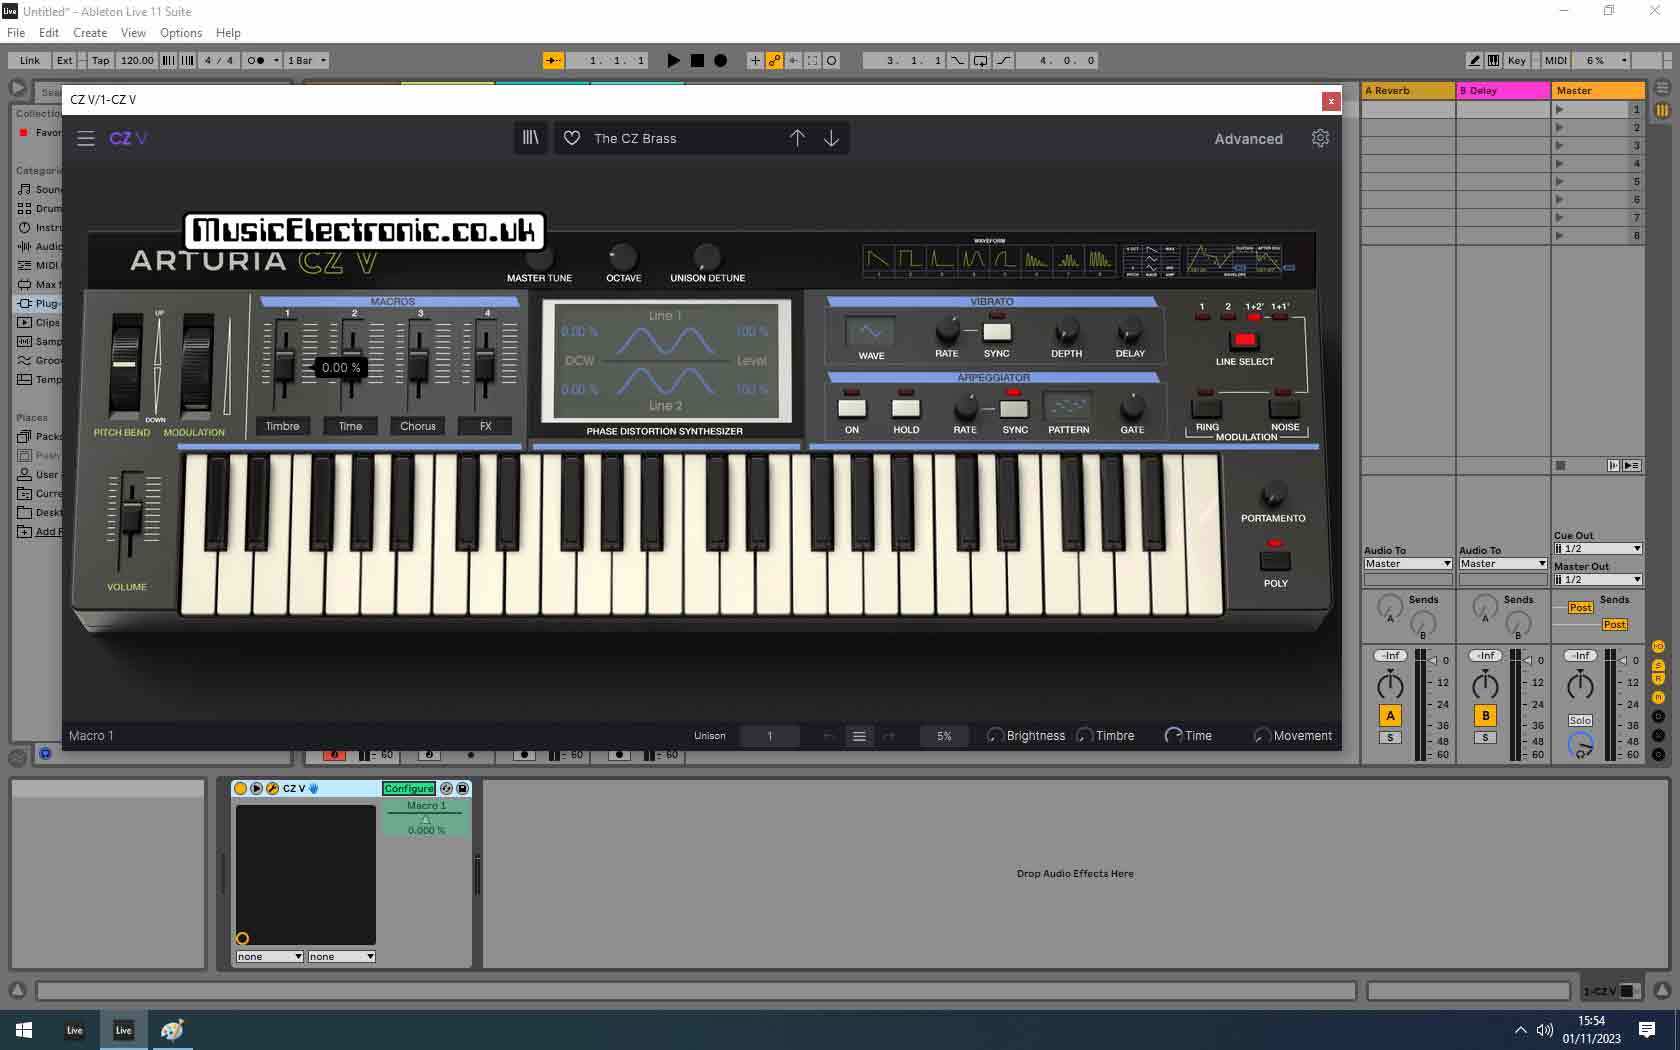
Next, click on the “MIDI” box and it will change to blue. Next click on the blue boxes that you just created and turn the “Assignable Controller” you want. Click on the others in turn and when you’ve finished click the “MIDI” button again to turn off the blue, back to grey.

The UC-16 will now control the “Arturia CZ V” controls that you have assigned and you’ll see them move on screen.
Tip
If you don’t seem to be getting anywhere, try a different lead to connect up your MIDI controller device.
I don’t know exactly what’s happening here but I’ve got my MIDI keyboard connected. So I unplugged it and plugged in my UC-16. If you turn the knobs you should see MIDI activity on Ableton Live.
I didn’t have anything. I tried another lead and to my surprise MIDI activity was shown on the screen.
The original lead works with the “M-Audio Oxygen 8 v2 MIDI controller keyboard” but not the UC-16!
Final thoughts about setting up MIDI controllers in Ableton Live
It can seem like a difficult task to get something that should be simple to work.
Especially when you think you’ve done everything correctly. Just follow the steps and you’ll realise there’s usually something you missed. On one occasion I set up a controller and it didn’t work.
Going through the steps I’d forgotten to tick the “Remote” box! In case you were wondering you can’t set up the buttons on the Evolution UC-16. Unfortunately, they don’t output any MIDI information so can’t be used.