

Ableton sound interface out and microphone
Have you tried to use Ableton Live with a sound interface and a microphone input?
I’ve used Ableton Live and various sound interfaces for a long time now however I still come across new questions for things I’m trying to do.
I’ve been using the Behringer U-PHORIA UMC204HD sound interface with my Audio Technica AT2020 microphone using the balanced input and using the Behringer to output sound to my monitor speakers using the Behringer driver. It all works well and it’s the set-up I use for recording. However,
I wanted a setup for quickly getting ideas down. In this setup, I wanted to use my Samsung CO1U USB microphone. The reasons for using this are that it’s easy to leave set up and it’s got a convenient table tripod so it’s perfect for when you get an idea and you want to just press record.
I wonder how many good ideas I’ve wasted because by the time I’d plugged in and set up the microphone I’d forgotten that gem that was going round my head.
For coming up with ideas you could try Sounddog Song studio and link it to Ableton
The Behringer driver and Ableton Live
What I thought would be a simple task turned out not to be (the story of my life). After all, it’s just a USB plug-in and-play microphone. Well, it is but although it doesn’t require drivers to work in Windows and even in a DAW, the problems arise when you are using another sound interface at the same time.
In my case the Behringer and the Behringer driver. As I’m sure you’ve done before once you’ve installed the drivers for the sound interface you go to “Preferences” in Ableton Live, then select the “Audio” tab. Then you select your device in the “Audio Device” pull-down.
If you do that though you can’t access the Samsung USB microphone. If you set the audio up so the USB microphone works you don’t get any sound out of the Behringer interface. Ableton Live now outputs its sound through the machines output.
How do you use a sound interface and a USB microphone together?
You’ll be relieved to know that this can be done. There may be other ways to do it but I’ll show you how I got it all working. It’s exactly how I wanted, but has taken longer than I thought.
Step by Step
Step 1. The first step is to get your sound interface working with Ableton Live. In my case, it’s just a case of installing the driver for the Behringer and selecting it in the audio preferences. Once you’ve done that just check that it’s outputting sound.
Step 2. The next step is to plug your USB microphone into the computer. You can check this works on its own by selecting it in Ableton Live’s audio preferences. If you select an audio channel in Ableton and select the input you should see the meter showing audio when you speak into the microphone.
Step 3. Next, install ASIO4ALL. I’ve gone into detail about ASIO4ALL here and how you can use it with laptops. You can use it if you don’t have a sound interface and you just want to use your machine’s outputs with low latency. If you’re not sure why you need low latency then read this. Once it’s installed, you’re ready to set it all up to work together.
Step 4. Back to Ableton Live’s “Preferences” and more specifically the “Audio” tab. In the “Audio Device” section, under “Driver Type” select “ASIO”. Underneath this select “ASIO4ALLv2” from the “Audio Device” pull down.
Next, click on the “Hardware Setup” button. This will bring up the “ASIO4ALL” panel. There are quite a few things that can be changed here but I won’t go into them here. This has been covered in my ASIO4ALL article so refer to that for more detail and some handy tips.
The only things to concern us here at the moment are the inputs and outputs. These are under the WDM Device List. Under “BEHRINGER UMC204HD 192K” select just “UMC204HD 192K Output”. Then under “High Definition Audio Device” you can select Samsung CO1U.


Testing it all out
You should now be able to set up an audio channel on Ableton select the input and see the audio meter as you speak into the microphone. You can test that the Behringer sound interface is actually outputting the sound as well. You’ll find that sound coming through your interface as well as the microphone output so be careful as you might get it feeding back.
Tip
You might find that it’s very quiet and doesn’t give you enough level.
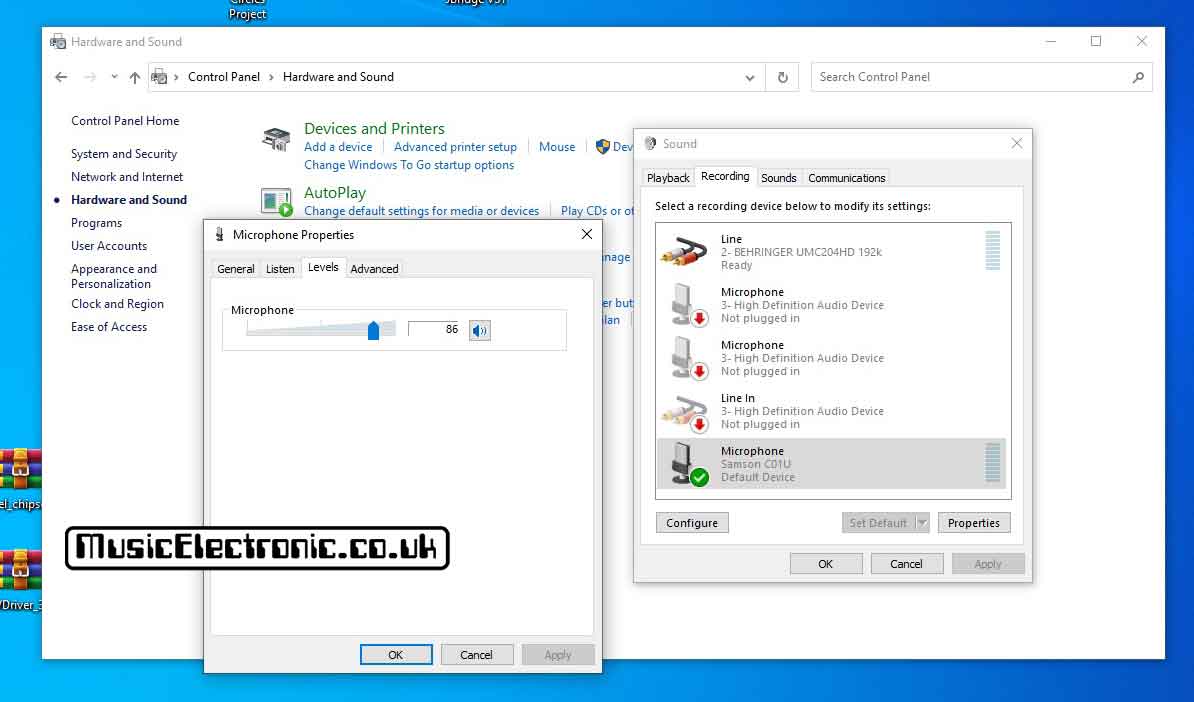
Go to the control panel and click on “Hardware and Sound”, then click on “Sound”. On the box that opens up, select the “Recording” tab and scroll down the list of devices until you find the one you want.
In my case this is “Microphone Samsung C01U” If you select this and “Properties” another box will open up.
This one is “Microphone Properties”. Along the top are various tabs. Click on the “Levels” tab and you’ll see the level slider and a box with its value. You can alter it here and refer back to Ableton’s meters to get the right level.


Ableton sound interface out and microphone – Final thoughts
Using ASIO4ALL I was able to use the Behringer audio interface.
This was the prime requirement as the Behringer is very good quality sound. I also wanted to be able to use this with the Samson CO1U. This is how I leave my setup so it’s quick to get ideas down.
I can still plug in the Audio Technica microphone for when I’ve got a finished song and I want to record the “real” vocals. That’s not to say that the Samson CO1U isn’t good enough for recording vocals. I prefer to use the Audio Technica AT2020 as it better suits my vocals and secondly if you use the Autotune microphone it’s one of the source microphones.
This guide covers setting up a sound interface with Ableton. If you want to know how to set up Ableton to work with Sundog Song Studio click here.