Ableton side chain compression
In this tutorial, I’ll explain what Ableton side chain compression is all about and how you can take advantage of this technique to control the dynamic range to make your music better.
Not only can you use it in a corrective way to enhance your mixes but you can also use it creatively to do things that sound a little different.
What is sidechaining?
Side chaining is a way of controlling a processor with an audio signal.
Probably the most common way side-chaining used was when a DJ used their vocal sound to control the output of a record deck. You spoke into the microphone and the signal turned down the music.
You stopped speaking and the music turned back up again. This was the simple voice ducking effect. With a compressor, the audio to control it goes to the sidechain input. The audio sound you want to affect goes to the audio inputs.
You can probably already see a few situations when being able to control one sound with another might be useful in music and audio production. If you can’t, I’ll give you one to start with. Controlling the bass line with the kick drum. This is probably the second most popular use of the sidechain on a compressor, behind voice ducking.

The problem with a kick drum and a bass line is they both take up similar parts of the audio range. If you’ve ever tried to produce a massive bass line and a thumping bass drum together you’ll know what I mean. You constantly tweak the levels and EQ as each one drowns the other. In the end, they both take over the mix and run the meters into the red.
In the end, it sounds awful and you can’t hear either in the way you wanted.
Tip
Side chaining is definitely something you learn more by doing than reading. Get it set up and play and listen to the results.
Sidechain compressor for drum and bass
Run the bass line through a compressor as the source track.
Next, control the signal with the bass drum routed to the sidechain. Get the controls just right and the bass drum will turn down the bass line just at the right time to be clearly heard. The two sounds are no longer competing at the same time.
The bass line is filling in the holes behind the kick drum. Incidentally, you can also achieve an effect where there is less competition at the “bottom” by cutting out notes in the bass line when the kick drum plays.
This is one of the staunch uses of the compressor side chain. I don’t think you’ll hear a dance track that doesn’t use a compressor in this way to sort out the bottom end. You can turn it up even further to create that pumping effect.
There are lots of other ways to use a side chain input. There are probably a few that haven’t been discovered yet. Experimenting used to be a lot more difficult.
Firstly you needed the equipment but also you had to manually route all the cables. Coming back to it and trying to remember what you did could be an event on its own. These days however with the Ableton side chain compressor you have no excuses not to. They have made it possible to route and try all sorts of things.
EQ and the sidechain input
You can connect any audio to the side chain input but you can also drastically EQ the controlling sound.
Why would you want to do that? Well if you do you can get the compression to be frequency-conscious and only compress what you want. An example of this is to de esse a vocal track. Sometimes excessive sibilance is strongly evident on a vocal recording.
The sound you produce when you sing “SSS” or “TH” is the high-frequency content. You can run the vocal through the compressor and route the same vocal through an EQ and into the side chain. Ordinary this set-up would have the vocal, turning the vocal down so it would be pretty pointless.
However, if you EQ so only the high frequencies are left going to the side chain, then only the high frequencies get turned down. Which is what a de-esser does. I find that a dedicated de-esser is all I need on my vocals. If that doesn’t do the job, an EQ and compressor can give you more control.
Using Ableton sidechain compressors
In this example, I’ve got a simple synth bass line and a 909 kit on separate tracks.
The bass line sounds OK on its own and the 909 kit sounds OK on its own. If you play the two together the bass line almost obscures the kick drum to the point that you can hardly hear it. If you add a “Glue compressor” to the synth bass track and select sidechain “Audio From” to track 3 909 core kit, from the dropdown menu, that whole track will act as the sidechain input for the glue compressor.
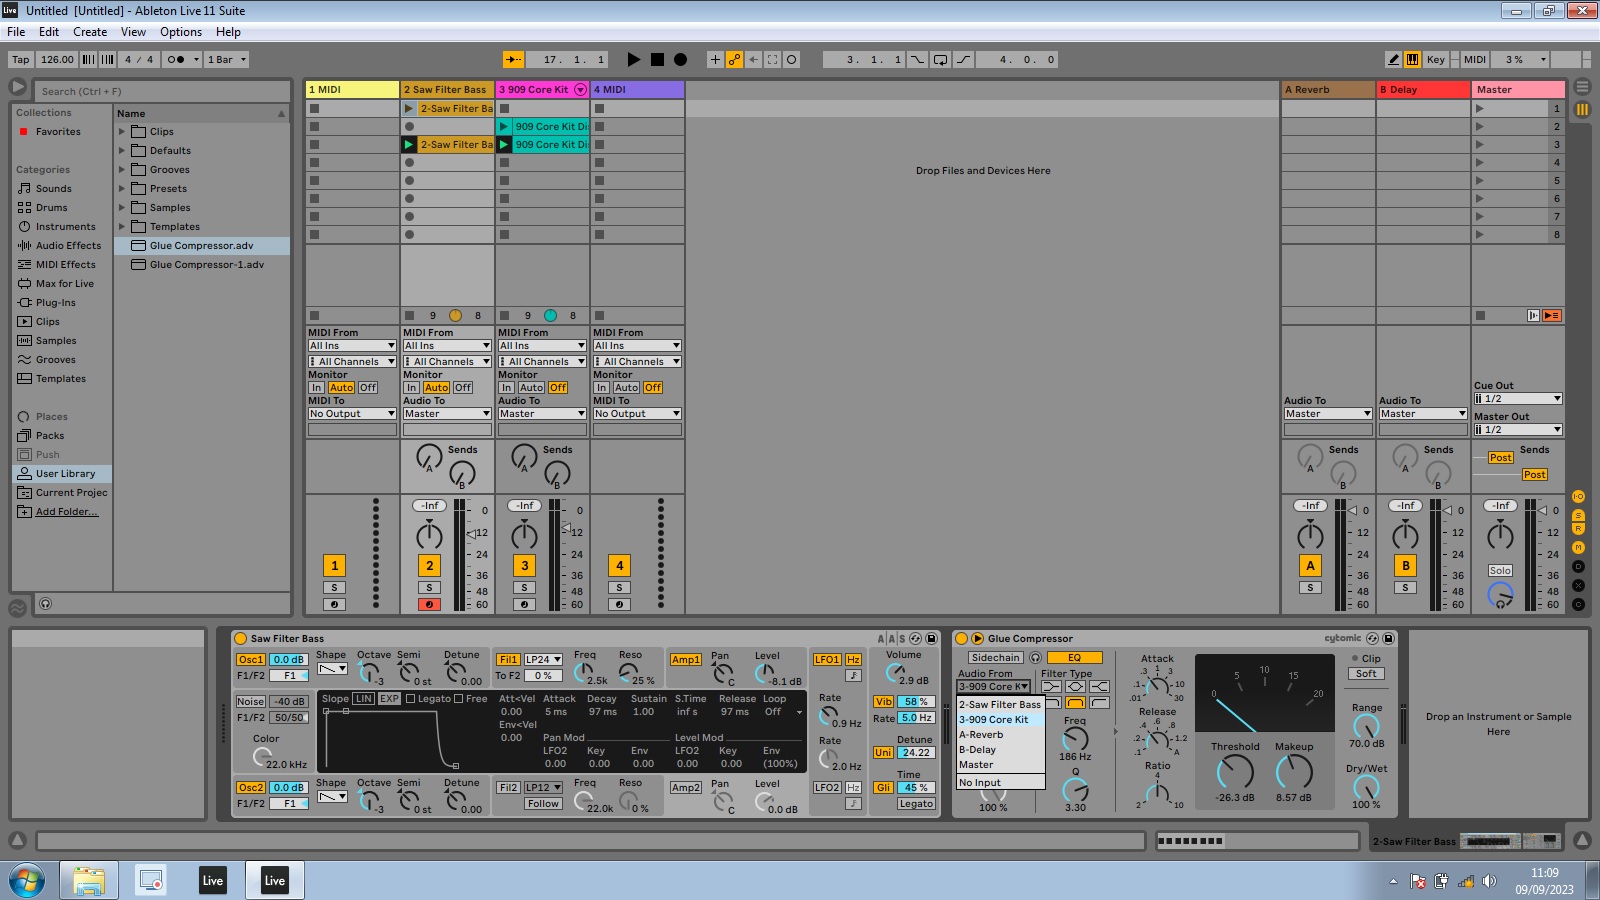
Now if you set up the compressor correctly and turn up the makeup gain control to make up for the gain reduction, you can hear the effect of switching the compressor on and off. When it’s “on” you can definitely hear the bass drum kick.
If you look at the meter on the master channel you’ll see that there’s hardly any difference in the output levels. You are just making a hole” in the synth bass sound for the kick drum to be heard. This is one of the best lessons you’ll learn on how to make better mixes.
Don’t just read about it get something similar set up and play around with it yourself. You’ll learn so much more.
Ableton side chain compression for vocals
I mentioned in the opening paragraph that one of the first and still most popular uses of side chaining was for a DJ to duck the music when they spoke.
You can achieve a similar effect on a complete mix to help the vocals come through more. As you are probably aware in most forms of music, the vocal is the most important part (sorry if you are a lead guitarist or drummer) and you don’t want them drowned by the other instruments.
You can route the other instruments to a subgroup and put a compressor on this (a glue compressor is ideal). Then route the vocal to the side chain and set it to slightly reduce the subgroup.
You don’t want to lower it to anywhere near the level a DJ would do. Just reducing it a few dB’s will be hardly noticeable to the music other than to make the vocals stand out more.
If you are looking to improve your vocal tracks check out my posts on where you record your vocals and tools to make the recording better. You will also need to get the rest of the audio effects just right and things like special reverb ducking techniques make that a lot easier.
Step by step – Ableton side chain compression
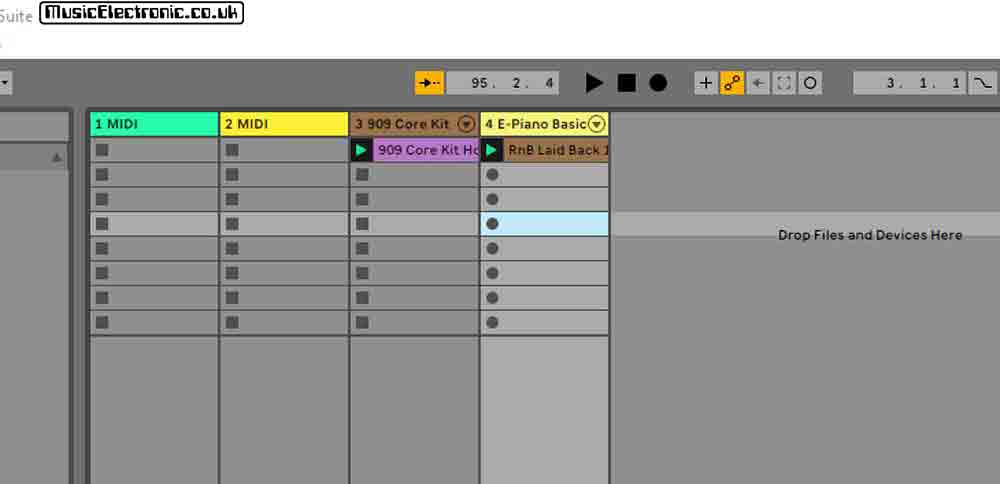
Step 1 Create or select your tracks
In this example, track 4 (4 E-piano Basic) is the track to be compressed.
Track 3 (3 909 Core Kit) is going to provide the sidechain.
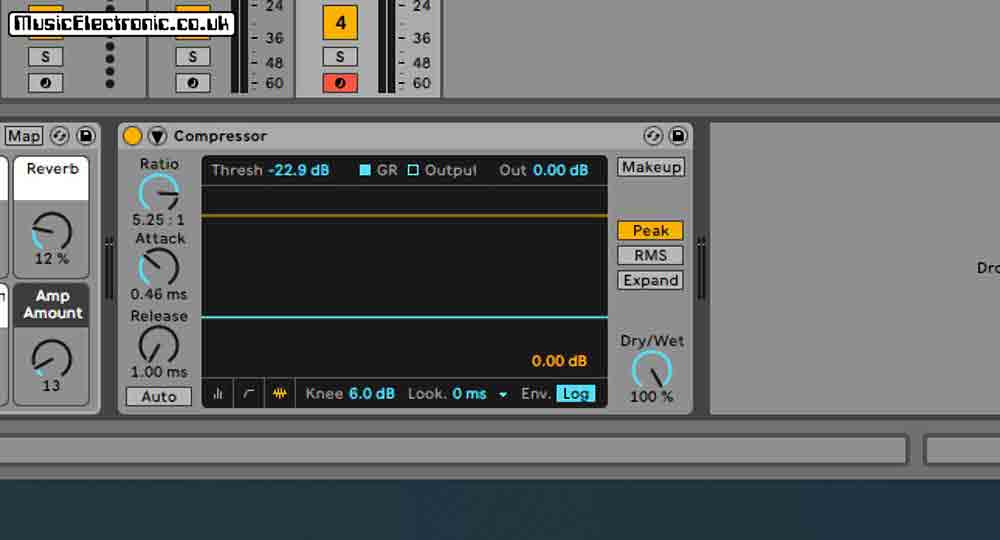
Step 2 Insert the compressor
Insert the compressor into the track you are going to compress.
In this example it’s track 4.

Step 3 Click on the down arrow
This opens up the sidechain options.
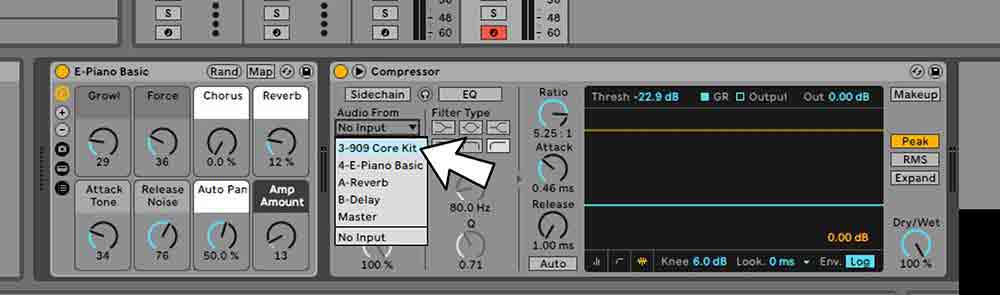
Step 4 Click on “Audio From”
This opens up the available tracks. In this example select 3-909 Core Kit.
Creative Ableton side chain compression ideas
As I mentioned earlier, Ableton side chain compression isn’t just for correcting and enhancing.
You can just as easily use it for creative purposes. One such way is to add a rhythmic element to a static synthesiser pad sound. Just add the Ableton compressor to the synth track and create a new track to control it. I use a drum sound, (it works best with something short).
You’re not going to hear this sound, just route it to the compressor side chain. Program a repeating rhythm on this track. Next, tweak the compressor’s parameters and you’ll have the rhythm you programmed imposed on the synth sound. You can do this to add rhythmic pulsing to any sound but it’s particularly effective on longer sounds.
This effect is good for pad sounds. You could try doing it to long reverb tails on sounds. Using sidechain compression on the reverb signal is how you create the ducking reverb effect for cleaner vocals.
Audio subtleties
Audio can be quite subtle and sometimes frustrating. Especially when you are trying to hear the difference between 2 bits of audio and they just sound the same.
Don’t get frustrated, or think if you can’t hear it straight away, it doesn’t matter. These subtleties can make the difference between something that sounds OK and something that sounds great!
My dad couldn’t hear the difference between my OSCar and Sequential Circuits Pro 1.
They both sounded like synthesisers. I guess if he had listened to them both for the amount of time I had, he would have been able to hear a sound and know instantly which one it came from.
You need to educate your ears. I listen with headphones and try and concentrate and then with speakers and try and relax, and not listen too intently. After a while, you sort of hear things that you didn’t initially. The more you listen the more things become apparent. You just need to put the time in and listen.
Other side-chain effects
In Ableton Live the compressor, glue compressor and the multi dynamics all have side chain inputs.
The gate also has a side chain input if you need a simpler on/off effect. Also, the auto filter has a side chain input that you can use if you want to get creative with filtering effects.
Tip
To take side-chaining to the next stage you can group tracks together. This will make it easy to side-chain and control levels.
You can then use one group to turn down another such as the vocal turning down instruments.
Final thoughts
One of the major parts of music production mixing is the levels of the tracks.
You can see why being able to control them automatically with compression and side chaining makes it such an important topic. Ableton Live makes this process easy.